Whilst many people might find this is easy, I think I have google zillions of page just to get a simple mvn release:prepare and mvn release:perform with BitBucket.
I thought I am going to write a blog here just to help out those you might need a dummy-guide to get maven prepare and perform working.
Please note that I am using Linux, and also running the command with Netbeans.
The public Key
- Firstly, do a
sudo apt-get install git - The next thing we need to do is to identify WHO you are, and that is done by generating public key, and then install in on
BitBucket. - Open another terminal
- Generate with command
ssh-keygen - Enter, enter passphrase etc, etc, just follow it. Until the key is generated.
- You will see similar image like this one — I just took Atlassian sample (Atlassian, 2015a):
$ ssh-keygen
Generating public/private rsa key pair.
Enter file in which to save the key (/Users/emmap1/.ssh/id_rsa):
Created directory '/Users/emmap1/.ssh'.
Enter passphrase (empty for no passphrase):
Enter same passphrase again:
Your identification has been saved in /Users/emmap1/.ssh/id_rsa.
Your public key has been saved in /Users/emmap1/.ssh/id_rsa.pub.
The key fingerprint is:
4c:80:61:2c:00:3f:9d:dc:08:41:2e:c0:cf:b9:17:69 emmap1@myhost.local
The key's randomart image is:
+--[ RSA 2048]----+
|*o+ooo.          |
|.+.=o+ .         |
|. *.* o .        |
| . = E o         |
|    o . S        |
|   . .           |
|     .           |
|                 |
|                 |
+-----------------+
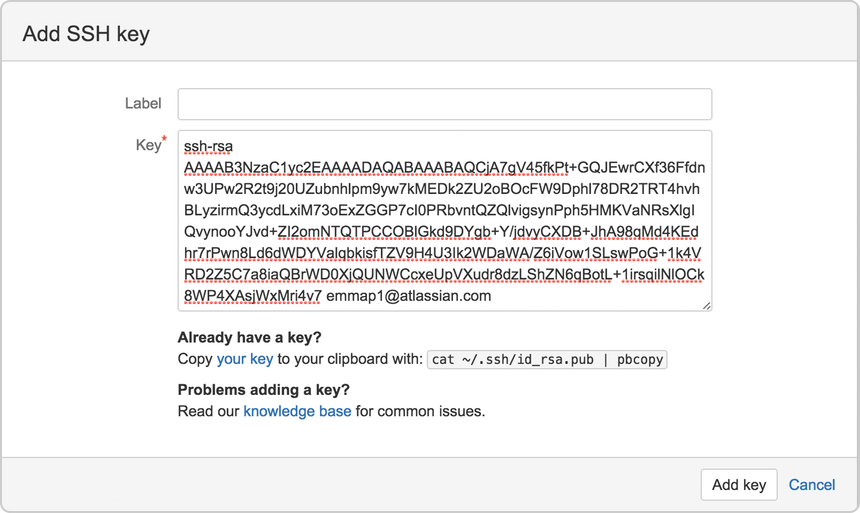
- You then need to access your
BitBucket, go to avatar > Manage account and then click on SSH Keys. Again I took this example from Atlassian article (Atlassian, 2015b)

The ‘release’ branch
When we perform a release, of course we need to create a branch where the artifacts being uploaded. So, go and login to your BitBucket and create a branch and call it 'releases'.
Modify pom.xml
What needs to be done next is to modify our pom.xml to point to the correct BitBucket account. Bear in mind that our git can now identify WHO we are since we have do the 'public key work in the previous section.
In order to deploy artifacts on remote Git SCM repository, we need to use a plugin called wagon-git (Synergian, 2015).
The website provided in Synergian is very detail. Feel free to follow it. But I am going to show you snippet of my pom.xml anyway. comments interleaved.
<?xml version="1.0" encoding="UTF-8"?>
<project xmlns="http://maven.apache.org/POM/4.0.0" xmlns:xsi="http://www.w3.org/2001/XMLSchema-instance" xsi:schemaLocation="http://maven.apache.org/POM/4.0.0 http://maven.apache.org/xsd/maven-4.0.0.xsd">
    <modelVersion>4.0.0</modelVersion>
    <groupId>id.co.lucyana.hr.email</groupId>
    <artifactId>lucyhr-api</artifactId>
    <version>1.5-SNAPSHOT</version>
    <packaging>jar</packaging>
    <properties>
        <project.build.sourceEncoding>UTF-8</project.build.sourceEncoding>
        <maven.compiler.source>1.8</maven.compiler.source>
        <maven.compiler.target>1.8</maven.compiler.target>
    </properties>

    <!-- FIRSTLY, add this. Please refer to Synergian documentation -->
    <pluginRepositories>
        <pluginRepository>
            <id>synergian-repo</id>
            <url>https://raw.github.com/synergian/wagon-git/releases</url>
        </pluginRepository>
    </pluginRepositories>

    <!--
        SECONDLY, you need to add your repository location. Just replace the one below
        particularly on 'dwuysan/lucyhr-api'.
    -->
    <repositories>
        <repository>
            <id>lucyhr-api</id>
            <releases>
                <enabled>true</enabled>
            </releases>
            <url>https://api.bitbucket.org/1.0/repositories/dwuysan/lucyhr-api/raw/releases</url>
        </repository>
    </repositories>

    <!--
        distributionManagement, it needs to point to the 'releases' branch we created. Pay attention to
        'git:releases://...'
    -->
    <distributionManagement>
        <repository>
            <id>lucyhr-api</id>
            <name>lucyhr-api</name>
            <url>git:releases://git@bitbucket.org:dwuysan/lucyhr-api.git</url>
        </repository>
    </distributionManagement>

    <!-- Again, make the changes accordingly to your own path -->
    <scm>
        <connection>scm:git:ssh://git@bitbucket.org/dwuysan/lucyhr-api.git</connection>
        <developerConnection>scm:git:ssh://git@bitbucket.org/dwuysan/lucyhr-api.git</developerConnection>
        <url>https://bitbucket.org/dwuysan/lucyhr-api.git</url>
        <tag>HEAD</tag>
    </scm>
    <dependencies>
        <dependency>
            <groupId>javax</groupId>
            <artifactId>javaee-api</artifactId>
            <version>7.0</version>
            <scope>provided</scope>
        </dependency>
    </dependencies>
    <build>

        <!--
            So that we can perform mvn:release prepare and mvn:release perform, we need to add
            maven-release-plugin. That one is quite basic.

            BUT

            remember to add wagon-git
        -->
        <plugins>
            <plugin>
                <groupId>org.apache.maven.plugins</groupId>
                <artifactId>maven-release-plugin</artifactId>
                <version>2.5.3</version>
            </plugin>
        </plugins>
        <extensions>
            <extension>
                <groupId>ar.com.synergian</groupId>
                <artifactId>wagon-git</artifactId>
                <version>0.2.5</version>
            </extension>
        </extensions>
    </build>
</project>
That’s it! You can do now mvn:release prepare and mvn:release perform, with your released artifacts uploaded to BitBucket.
References
Atlassian, 2015a, ‘Set up SSH for Git’, Atlassian, accessed on 27 October 2015
Atlassian, 2015b, ‘Add an SSH key to an account’, Atlassian, accessed on 27 October 2015
Synergian, 2015, ‘wagon-git’, Synergian, accessed on 27 October 2015
